Diy Valentine's day nails at home
Discover chic DIY Valentine’s Day nail ideas—from soft nudes to bold reds—plus step-by-step tips, tools, and inspo for every skill level.
BEAUTY
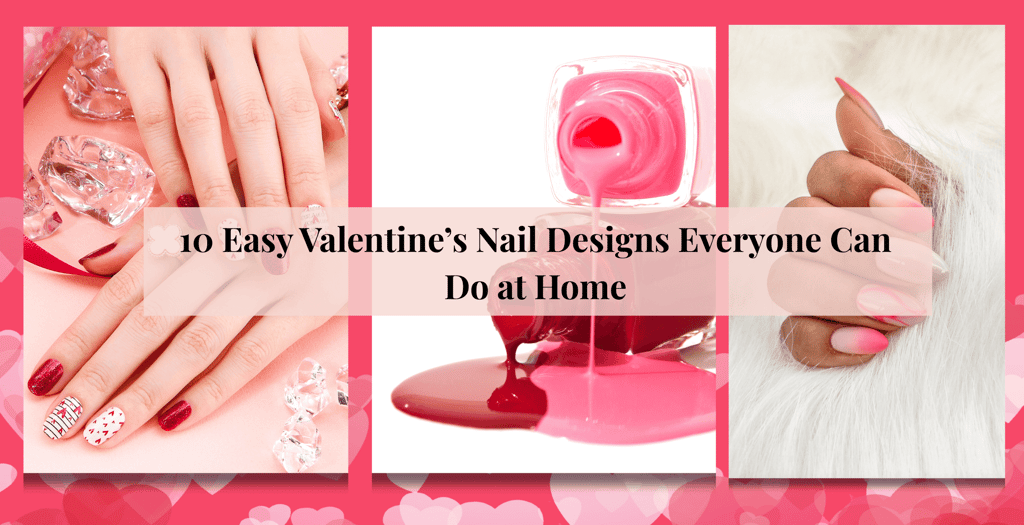

Love is in the air—and it’s prime time for romantic nail looks. Picture sheer nudes, classic reds, lacquer-shine finishes, and just enough detail: a dainty heart, a single gem, or a sleek graphic line. Valentine’s Day nails don’t have to be loud to make a statement. Bright pinks and reds feel bold and playful; soft pastels and milky nudes stay polished well past February 14. The best part? You can create every one of these looks at home. DIY Valentine nails are quick, customizable, and perfect for date night, Galentine’s, or simply celebrating the season of love. 💕

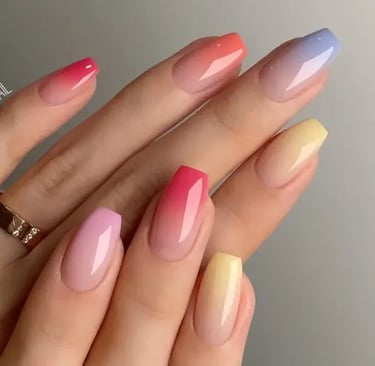
rainbow ombre
Step-by-Step
Prep nails – File, push cuticles, lightly buff, and apply base coat.
Base color – Apply 1–2 coats of milky white or sheer nude.
Create the rainbow – Paint rainbow stripes (pink, orange, yellow, green, blue, purple) onto a makeup sponge.
Sponge on – Dab gently onto nails. Repeat 2–3 times until blended.
Smooth it – Add one thin top coat to soften the texture.
Valentine touch – Add tiny hearts, a fine glitter tip, or one small rhinestone.
Seal – Finish with glossy top coat and cuticle oil....
Amazon Must-Haves
Pastel or rainbow nail polish set (Beetles or Modelones)
Dotting tool (for hearts)
UV/LED lamp (if using gel)
Soft Pink Nails With White Hearts — Step by Step (DIY at Home)
Prep (makes it look salon-clean)
File to a soft square or short almond
Push back cuticles + lightly buff
Wipe nails clean (alcohol pad works)
Apply base coat
Paint the soft pink base
Apply 1–2 thin coats of a sheer/milky pink
Let fully dry between coats (or cure if gel)
Create the white hearts
Add two small white dots side-by-side (this is the top of the heart)
Use a toothpick or dotting tool to gently drag down into a point
Keep hearts on 1–2 accent nails for a modern look
Clean the edges
Dip a small brush in remover and clean around the cuticle line
Seal + shine
Apply a glossy top coat (this smooths everything and makes it pop)
Finish with cuticle oil for that fresh manicure glow
Amazon must-haves
Soft pink polish: Essie Ballet Slippers (classic sheer pink)
White hearts: a white nail art pen (fast + beginner-friendly) or white polish
Dotting tool set: makes hearts 10x easier than freehand
Top coat: Seche Vite for that glassy finish
Cuticle oil pen: makes nails look instantly “done.”
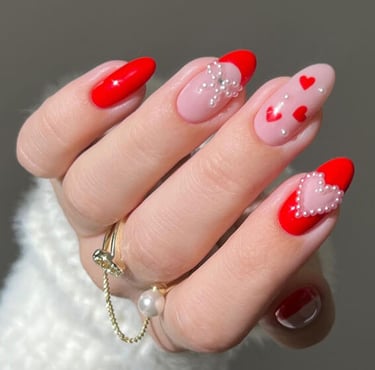
Classic Red & Gold Heart Nails for Valentine’s Day
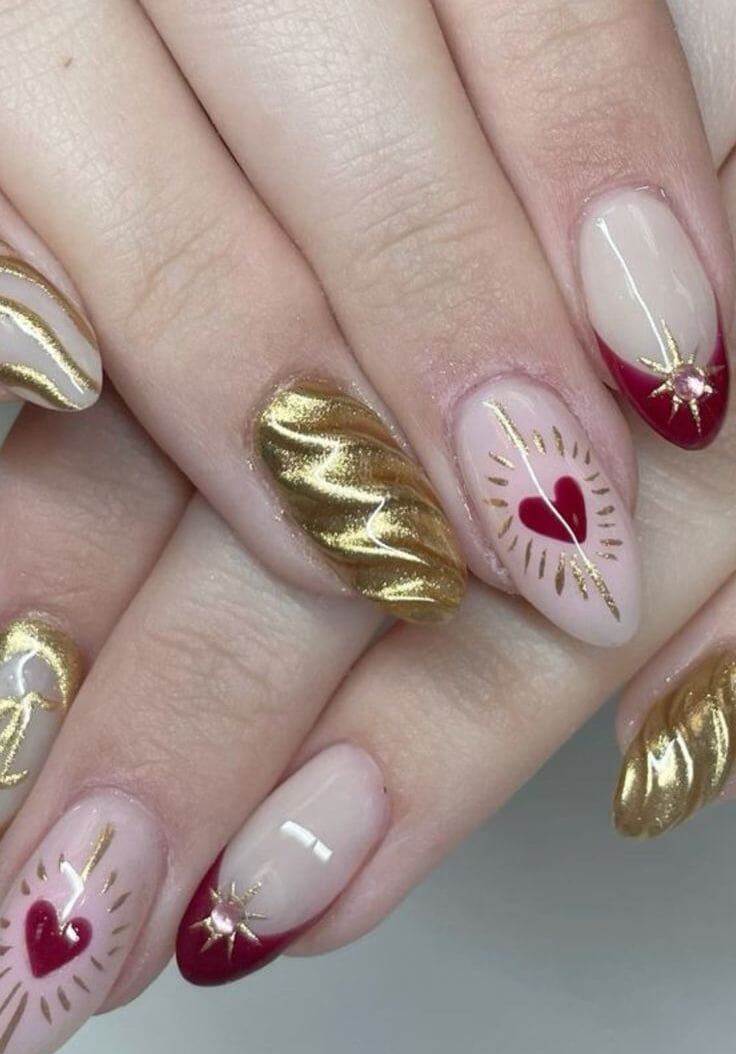
A timeless Valentine look that feels romantic, confident, and elegant—perfect for date night and still chic after the holiday.
Step-by-Step (Easy at Home)
Prep – File, push cuticles, lightly buff, apply base coat.
Red base – Apply 2 thin coats of a classic cherry or deep red. Let dry.
Gold hearts –
Use a gold nail art pen or foil to create tiny hearts, or
Dot two gold dots and drag down with a toothpick to form a heart.
Keep hearts on 1–2 accent nails for a luxe finish.
Optional glam – Add one micro rhinestone at the heart’s center or near the cuticle.
Seal – Finish with a glossy top coat. Add cuticle oil.
Amazon Must-Haves
Classic red polish (cherry or ruby)
Dotting tool or toothpick (for clean heart shapes)
Glossy top coat (for a glassy finish)
Tiny clear or gold rhinestones (optional)
cradit:@glowcreativehub

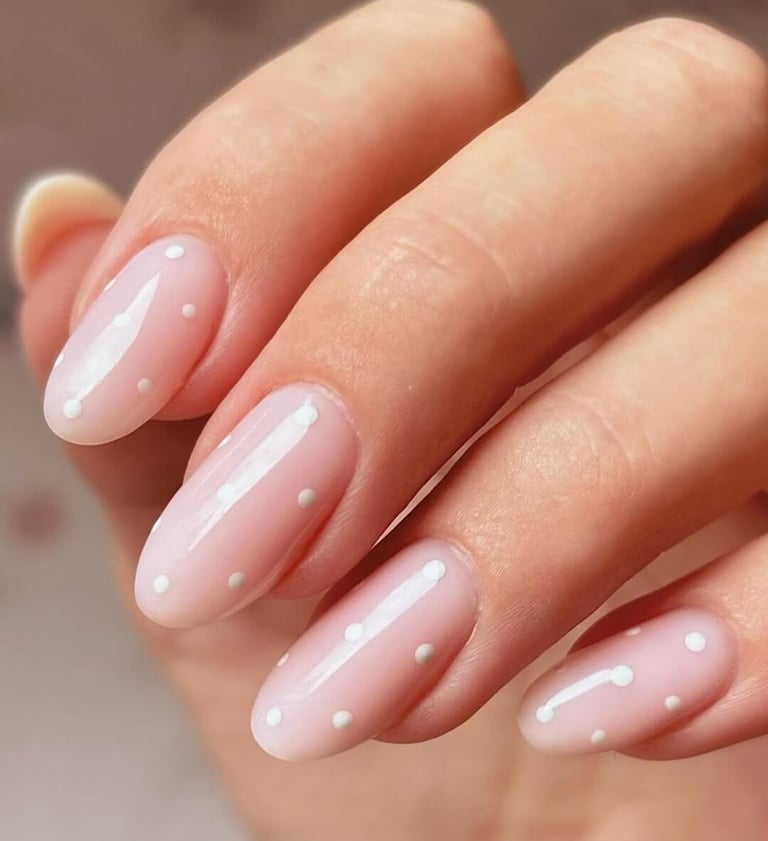
Soft Pink + White Polka Dots — Step by Step (DIY)
Prep: File, push cuticles, lightly buff, apply base coat.
Soft pink base: Paint 1–2 thin coats of sheer/milky pink. Let dry.
Make the dots: Dip a dotting tool (or bobby pin/toothpick) into white polish. Tap lightly to place dots.
Keep it cute:
Even dots = classic
Random dots = modern
Try micro dots on one accent nail for a chic twist
Seal: Finish with a glossy top coat + cuticle oil.Seal: Finish with a glossy top coat + cuticle oil.

Amazon must-haves
Sheer soft pink polish (milky pink)
Opaque white polish (for crisp dots)
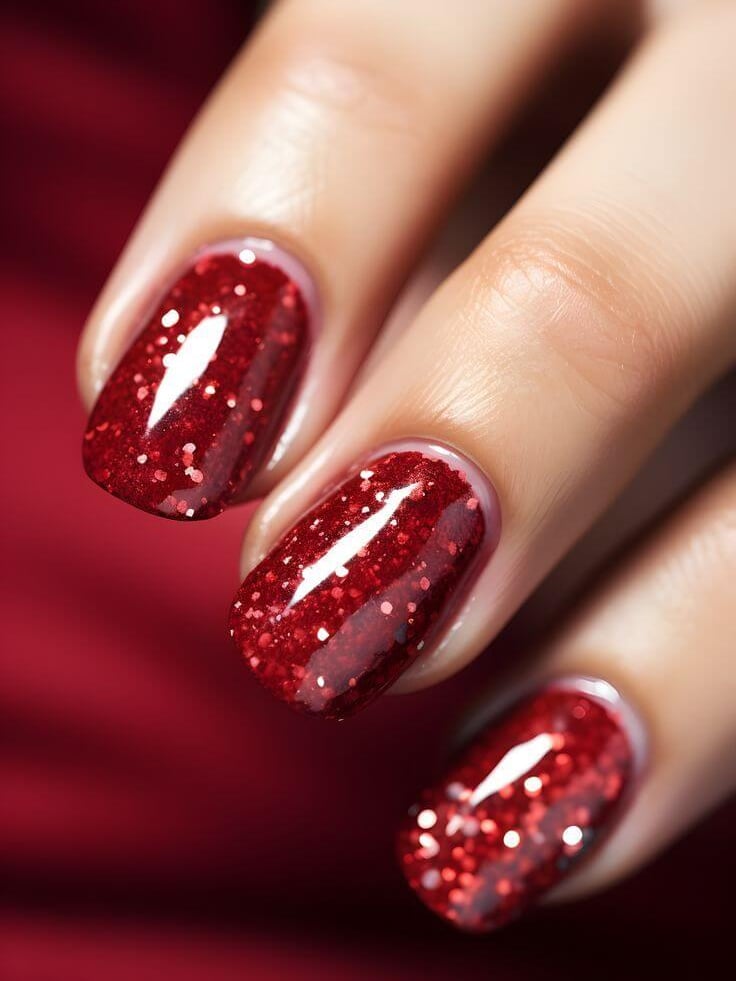
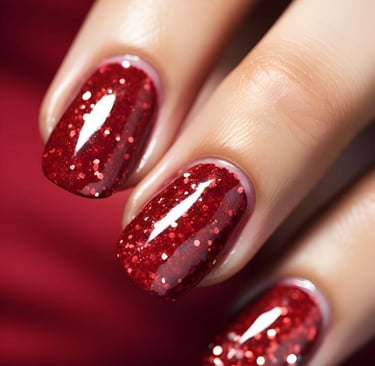
Glittery Red Nails at Home (Easy, High-Impact)
Step-by-step
Prep: File shape, push cuticles back, lightly buff, wipe nails clean.
Base coat: 1 thin layer (helps with wear + smoothness).
Apply glitter red (Option A = easiest):
Paint 2–3 thin coats of a red glitter polish, letting each coat dry fully.
Or layer it (Option B = more “wow”):
1 coat classic red, then 1–2 coats red glitter topper over it.
Seal with glossy top coat: 1 generous layer to “glass” the glitter and smooth texture.
Finish: Cuticle oil for that fresh, luxe look.
Pro tip: Thin coats = smoother glitter and faster dry time.
You didn’t come this far to stop
amazon must haves
Red glitter nail polish (search: “red glitter nail polish”)
Base coat (OPI base coat works great)
Fast-dry glossy top coat (Seche Vite style)
Cuticle oil pen (search: “cuticle oil pen”)
If using gel: gel kit + UV/LED lamp
classic red & pearl pink Valentine’s nails
Base & Finish
Base coat polish
Matte top coat polish
Gel base coat (if doing gel)
Gel top coat (if doing gel)
Color
Classic red nail polish
Blush/milky pink nail polish
Red gel polish (optional gel version)
Blush/milky pink gel polish (optional gel version)
Tools & Details
Mini flat-back nail pearls
Nail rhinestone/pearl glue
Thin nail art brush (for French tips)
Dotting tool set (optional for precision)
UV/LED lamp (if using gel polishes)
Finish care
Cuticle oil pen

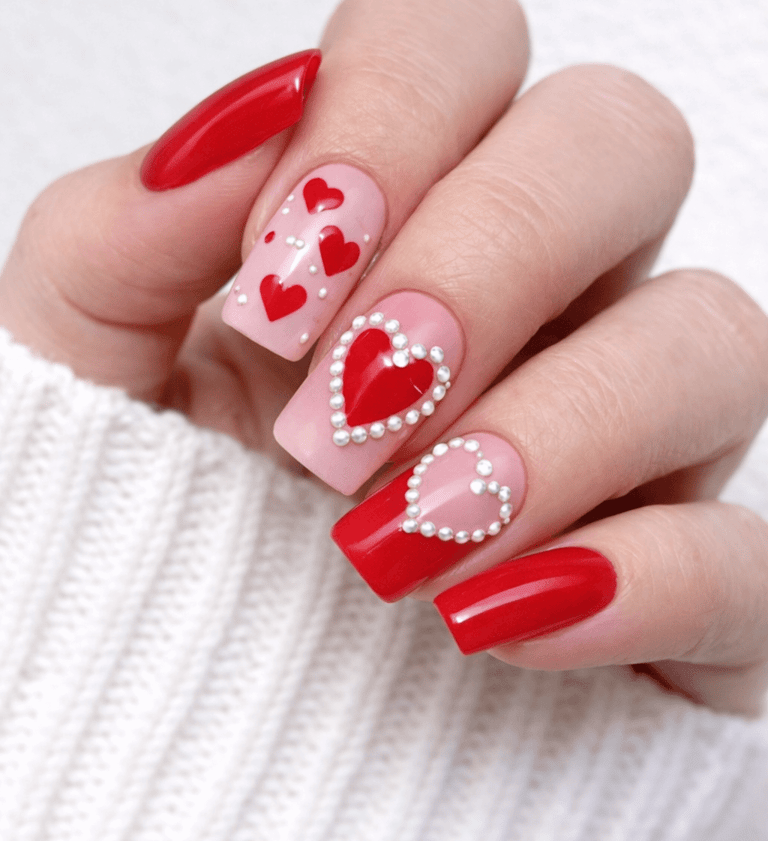
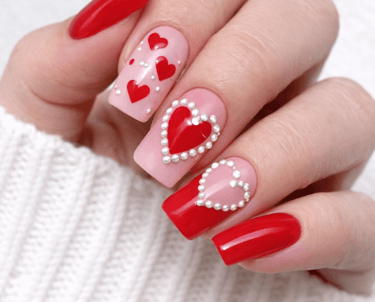
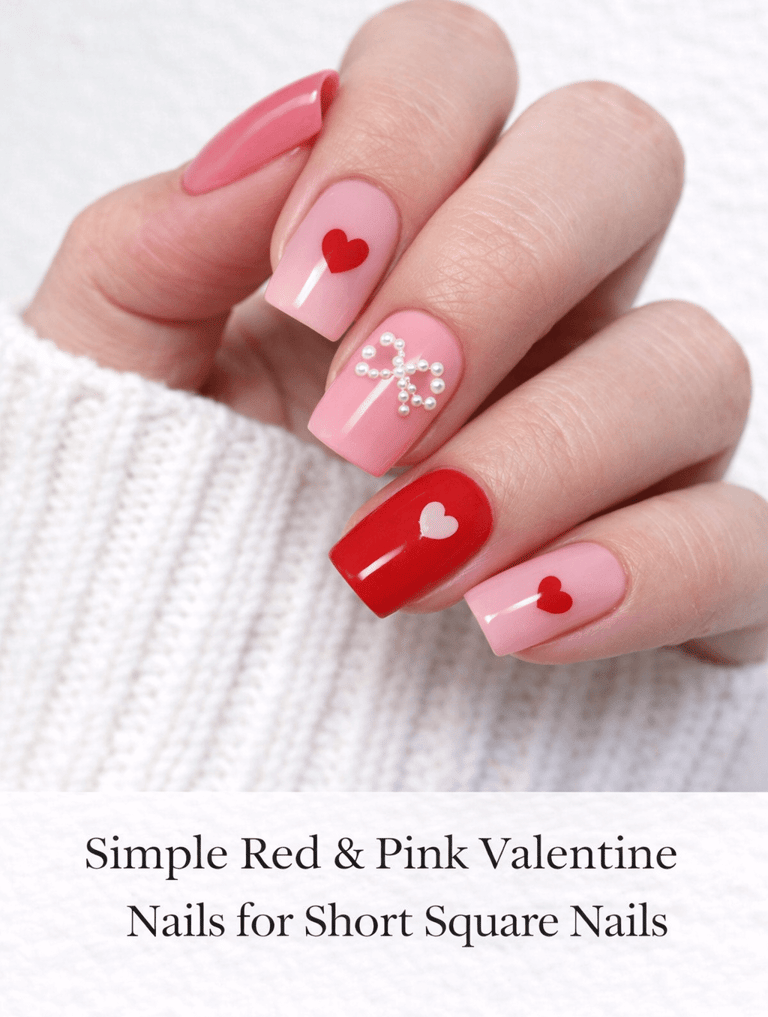
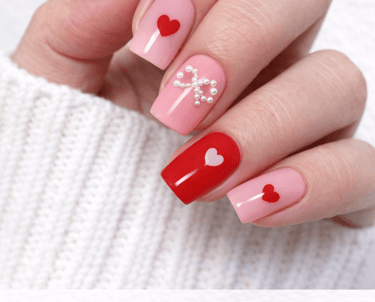
Short Square Red + Pink Heart Valentine Gel Nails (DIY)
Step-by-step
Prep + shape: File into a short square, push cuticles back, lightly buff, wipe with alcohol.
Base coat: Apply gel base coat, cure.
Color layout:
Paint two nails solid red (thumb and pinky look best), then cure.
Paint 2–3 nails milky pink, cure.
Apply a second thin coat if needed, and cure.
Red French tip (accent nail): On one pink nail, paint a red French tip, cure.
Heart art:
On one pink nail, paint 2–3 small red hearts (a dotting tool works best), then cure.
On another pink nail, paint one larger red heart centered, cure.
Pearl heart outline: Add a thin line of rhinestone glue/gel around the heart shape and place mini pearls with tweezers. Cure (or let glue set).
Top coat: Seal with gel top coat, cure.
Tip: Top coat around pearls, not over them, so they stay shiny and don’t look cloudy.
Finish: Wipe sticky layer (if needed) + apply cuticle oil.
Amazon must-haves
Gel base coat + gel top coat set (no-wipe top coat preferred)
Classic red gel polish
White gel polish or nail art pen (optional for tiny dots/details)
Rhinestone glue gel (or nail gem glue)
This Valentine’s nail look is romantic, feminine, and ultra-detailed with a soft luxury vibe. The design features a milky white and blush-pink base on almond-shaped nails, decorated with tiny red heart accents, delicate pearl outlines, and a standout 3D white bow for a coquette-inspired finish. The mix of glossy white, sheer pink, and minimal red details keeps the look playful yet elegant—perfect for Valentine’s Day while still feeling elevated and Pinterest-worthy.
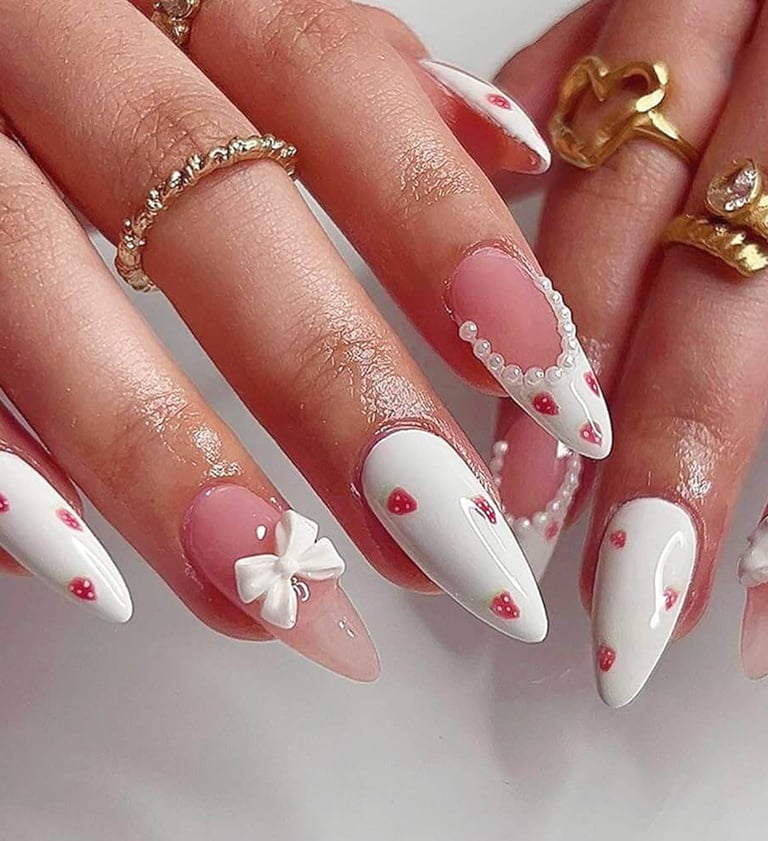
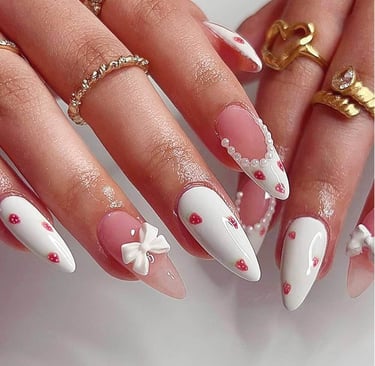
Coquette Valentine Nails With Pearls, Bows & Tiny Hearts
amazon must haves
Milky white gel nail polish
Sheer blush or nude pink gel polish
Red gel polish or red nail art pen (for tiny hearts)
Gel base coat
No-wipe gel top coat
UV/LED nail lamp
Dotting tool set (for heart details)
Thin nail art liner brush
Mini flat-back pearls
3D nail bows or nail charms
Rhinestone or nail charm glue (gel-based preferred)
Tweezers for nail art placement
Cuticle oil pen
short square Valentine’s Day nails with a clean, romantic, and beginner-friendly design. The manicure mixes soft blush pink and classic red for a timeless Valentine's color palette. Simple heart details add a playful touch, while the pearl bow accent creates a subtle coquette vibe without feeling overdone. The glossy finish and minimal artwork make this look perfect for at-home DIY nails—cute, polished, and easy to wear even after Valentine’s Day.
amazon must haves
White gel polish or nail art pen (for hearts)
Dotting tool (for heart shapes)
Pearl bow nail charms
Rhinestone or nail charm glue (gel-based)
Tweezers for nail art placement
Alcohol wipes or nail cleanser
Cuticle oil pen

Create a striking yet elegant contrast with glossy cherry-red chrome paired with soft blush pink bases. The bold red chrome provides a vibrant, high-shine finish, while the blush pink is adorned with delicate red heart outlines for a romantic and refined touch. The almond shape and sleek, glassy finish elevate the design, making these nails ideal for Valentine's Day and sophisticated enough to enjoy well beyond the holiday.
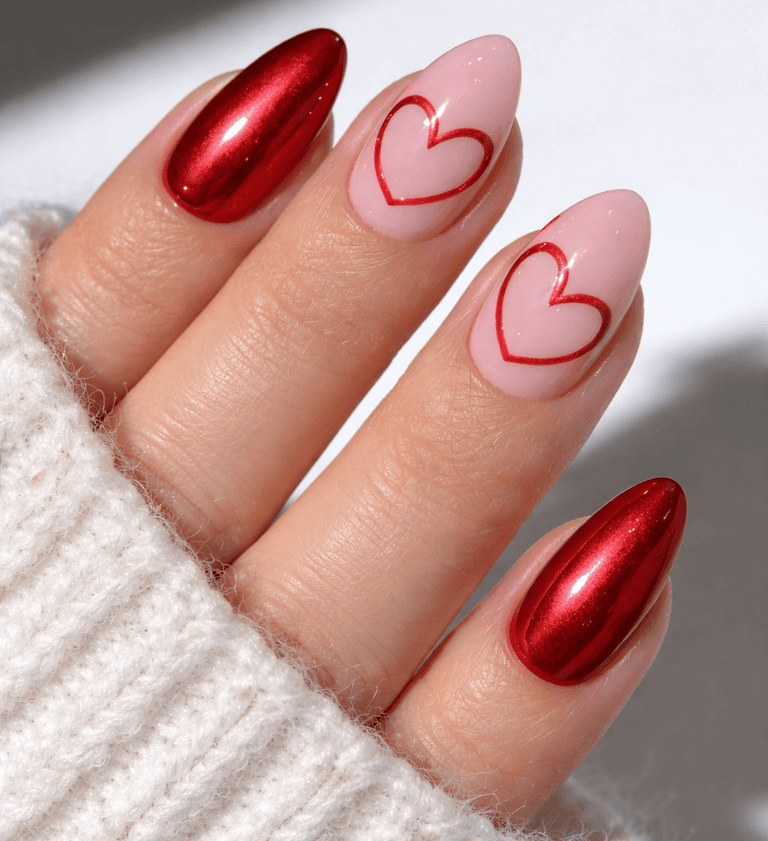

Cherry-Red Chrome & Blush Pink Valentine Nails
Step-by-step: Cherry-Red Chrome + Blush Pink Heart Nails (DIY)
Prep + base: File shape, push cuticles back, lightly buff, wipe with alcohol. Apply gel base coat and cure.
Blush pink nails: Paint 1–2 coats of blush pink gel on the middle/ring (or any two) nails. Cure each coat.
Red chrome nails (thumb/index/pinky):
Paint black gel base (optional, but makes chrome pop), cure.
Apply no-wipe top coat, cure.
Rub red chrome powder over the nail until mirror-shiny.
Seal with gel top coat, cure.
Heart outlines (on blush nails): Use a thin liner brush with red gel (or a nail art pen) to draw a simple heart outline. Cure.
Final seal: Apply gel top coat over all nails (avoid flooding cuticles), cure.
Finish: Wipe sticky layer if needed, apply cuticle oil.
Quick tip: Practice the heart shape on paper once, then draw it in 2 strokes (left curve, right curve).